Foreward
This was originally posted by me to the FT86 Club Forums in 2018. Recently, the FT86 Club Forums have had a few incidents where it’s been offline and the admins are not responsive to my offers via email to help ensure the site stays up for the long haul. I am making an effort to rehost content I’ve written, as well as rehost content written by others (with acknowledgements) that’s important information to preserve.
Changelog
- Updated part numbers for crush washers, need to find fill plug o-ring part number. These changed apparently.
- Modified the simplified form of the instructions slightly.
DIY: Automatic Transmission Fluid Change
Howdy,
As part of the process of installing an ATF cooler this week, I had to do an automatic transmission fluid change, and I noticed there wasn’t any DIY guides on the forums for this yet, so figured I’d write one up.
Disclaimer: While I didn’t think the process itself was all that bad after I’d done it once, it is one of those things where if you mess up the fluid leveling procedure it could cause serious damage to your transmission. So be aware, pay attention, and if in doubt take your car to a professional.
Tools Needed:
- A floor jack
- Four (4) jack stands
- 10mm, 12mm, 14mm, and 24mm sockets
- 5mm hex key or hex key socket
- A small piece of wire to make a jumper
- A fluid transfer pump
- An oil drain pan that can hold 8 quarts or more
- Gaskets for the three plugs, 2x crush washers for the drain and overflow plugs Subaru Part# 17008AA000, and 1 O-Ring for the fill plug Subaru Part# TBD
- 7 US quarts of Toyota WS or approved full synthetic ATF. I used Redline D6 ATF
Reference Documentation
Steps:
- Safely jack the car up on a flat horizontal surface and get all four wheels off the ground on jack stands
- Remove the engine under tray (12mm and 10mm bolts)
- Remove the transmission under tray (10mm bolts)
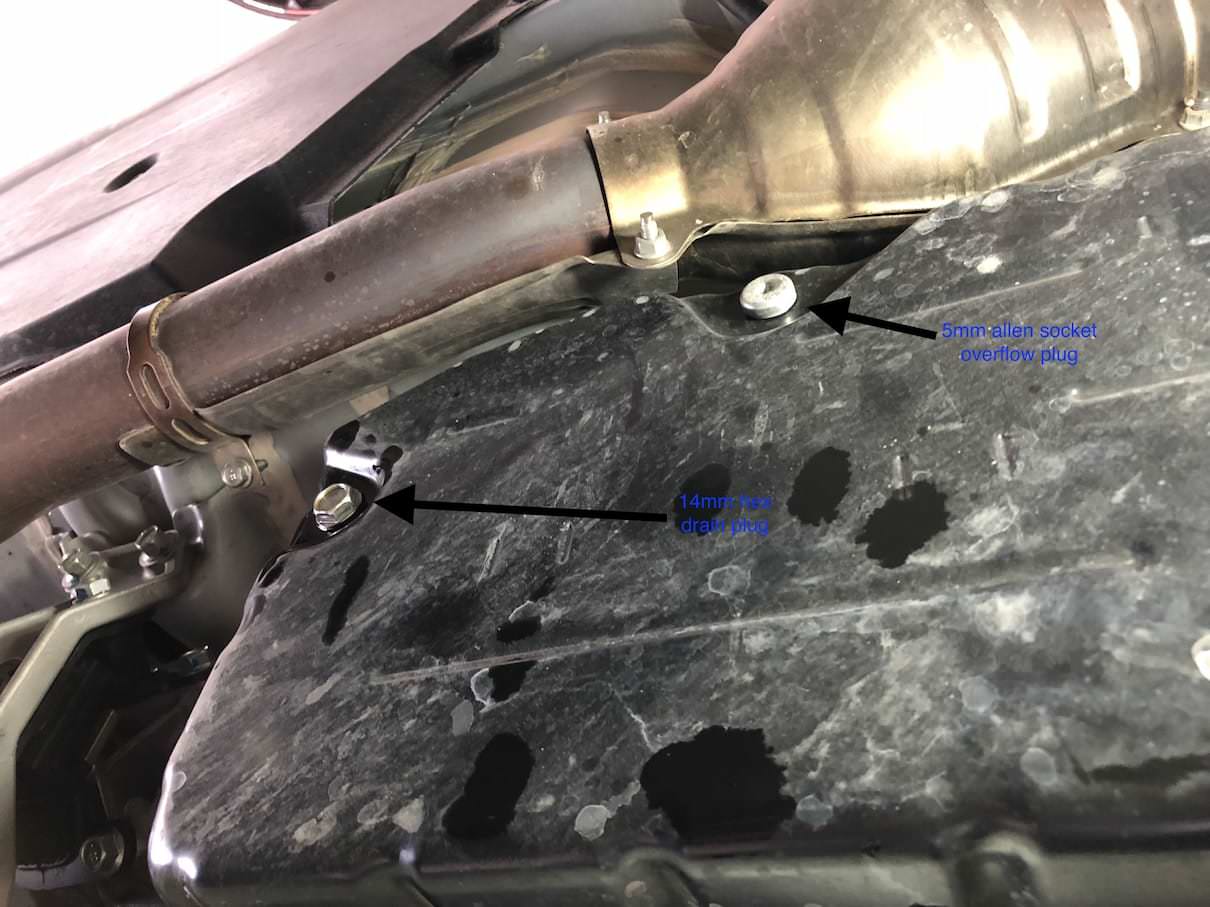
- Prepare your oil drain pan and a ratchet with each 14mm and 24mm sockets and the 5mm hex key socket.
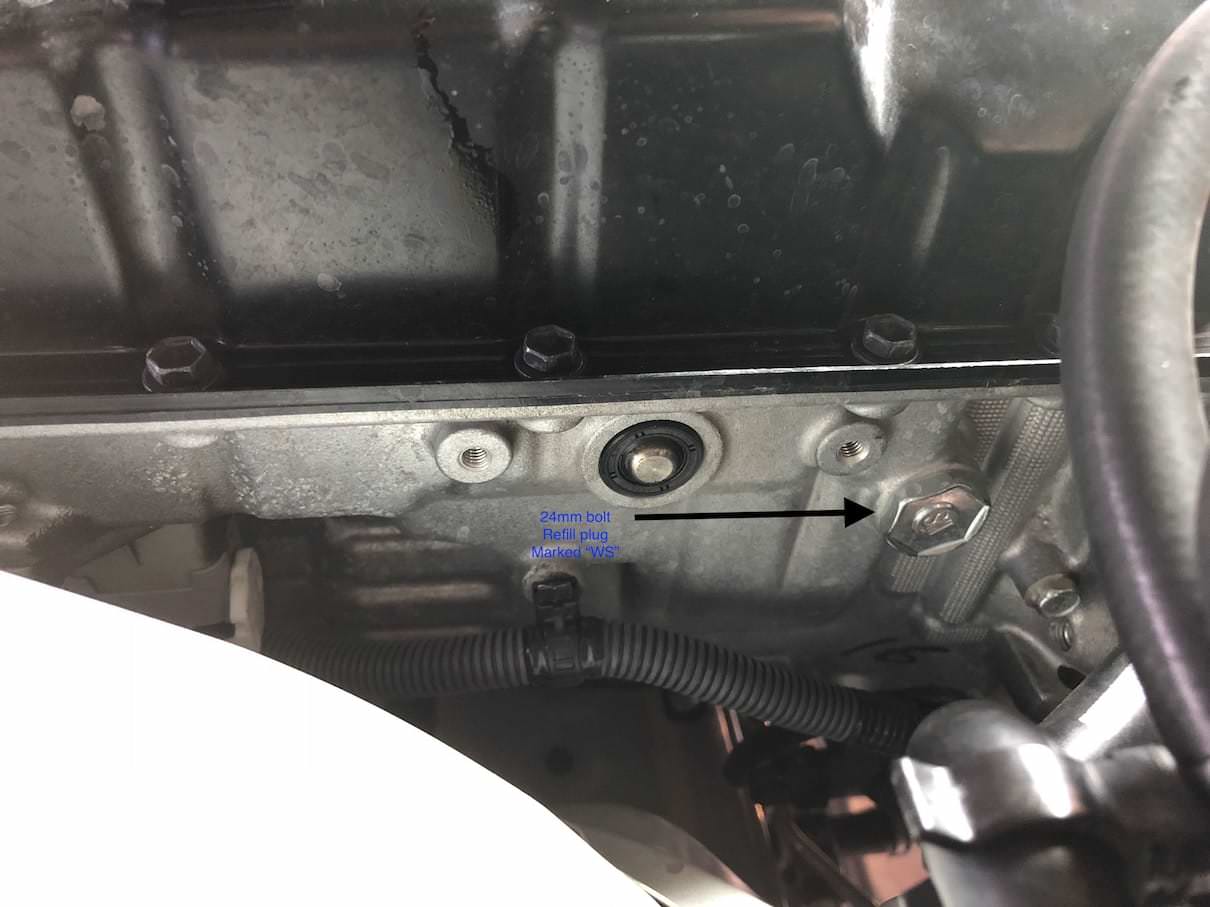
- Ensure you can remove the 24mm refill plug by breaking it loose
- Remove the drain plug to drain into the pan, don’t lose the crush washer
- Install and tighten the drain plug and crush washer
- Remove the refill plug
- Using the fluid transfer pump, add 2.1 US quarts of ATF (I added 2 quarts-ish, and then had one bottle I funneled the last bits I couldn’t pump into and used it to get myself a .3 or so into the last go)
- Install and tighten the refill plug, making sure to lightly lubricate the o-ring with ATF
- Crank the engine, allow it to idle for a moment and then while keeping your foot on the brake slowly move from Park to Manual and back to Park, pausing for a moment at each one. Do this twice.
- Shut the engine off, allow to cool for 2-3 minutes
- Remove the drain plug to drain into the pan, don’t lose the crush washer
- Install and tighten the drain plug and crush washer
- Remove the refill plug
- Using the fluid transfer pump, add 2.1 US quarts of ATF
- Install and tighten the refill plug
- Crank the engine, allow it to idle for a moment and then while keeping your foot on the brake slowly move from Park to Manual and back to Park, pausing for a moment on each one.
- Shut off the engine, allow to cool for 2-3 minutes
- Remove the drain plug to drain into the pan, discard old crush washer
- Install and tighten the drain plug with a new crush washer ensuring you lubricate the crush washer lightly with ATF
- Remove the refill plug
- Using the fluid transfer pump, add 2.1 US quarts of ATF + any dregs remaining from previous additions
- Remove old o-ring from refill plug and install a new o-ring, lubricating lightly with fresh ATF
- Install and tighten the refill plug
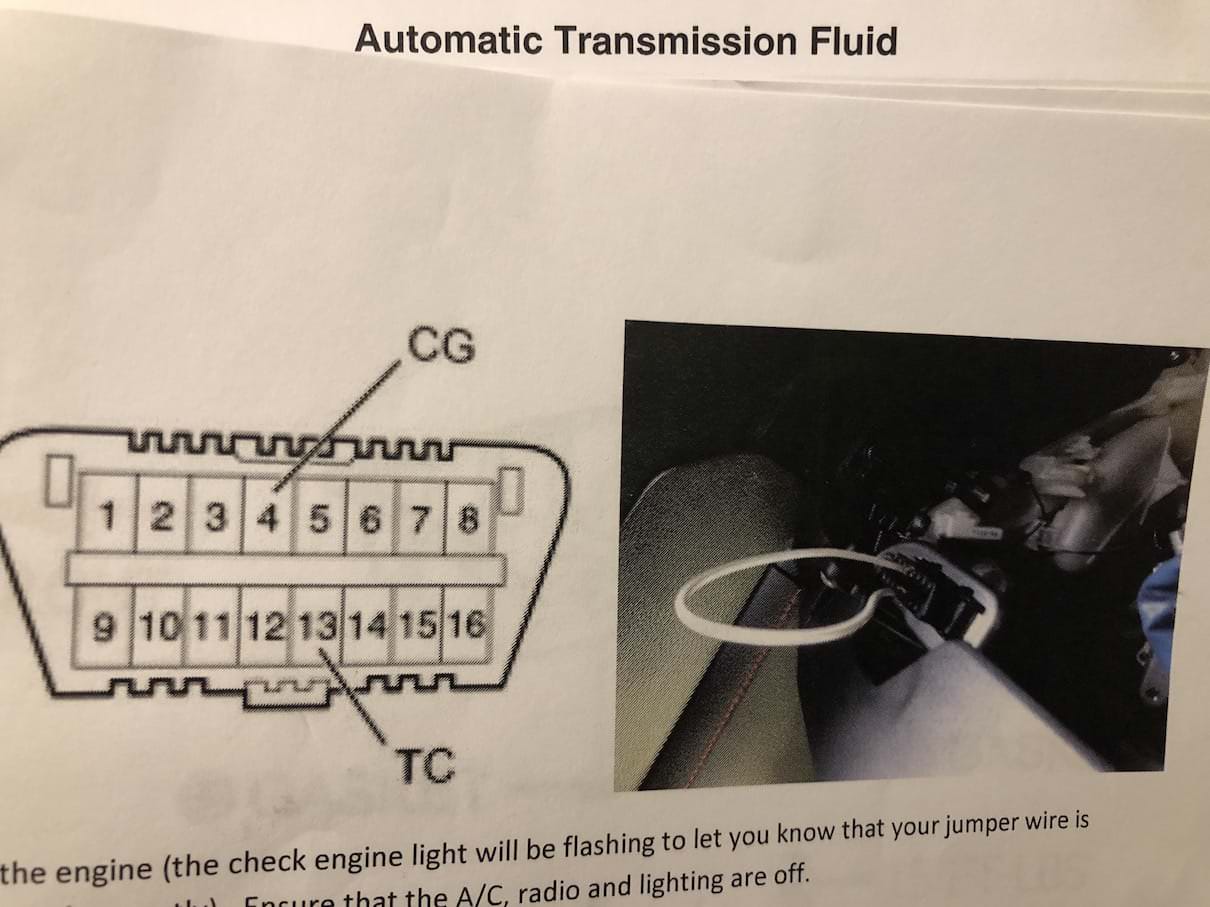
- Insert a jumper between pins 4 (common ground) and pin 13 (TC) on your OBD2 port
- Start the engine, your check engine light should be flashing to let you know you have the jumper connected
- With your foot on the brake, slowly move from Park to Manual and back to Park, pausing for a moment on each one.
- Then move the shifter to Drive and then quickly back and forth between Drive and Neutral (within 1.5 seconds) for at least 6 seconds. The car will be in fluid temperature detection mode when you see the up and down shift indicators illuminate together for 2 seconds and then turn off.
- Shift the car back into Park and remove the jumper wire.
- Leave the engine running.
- You should see the shift indicator showing in Park. If the up arrow is showing your transmission is too hot and you need to wait for it to cool off and try again, if the down arrow is showing the transmission needs to warm up. If both arrows are showing then the temperature is within the correct range (108F-117F).
- With both arrows showing and the engine idling, remove the overflow plug and drain into the pan.
- If fluid doesn’t come out, open the refill plug and add fluid until it drains from the overflow at a slow trickle, otherwise wait for fluid to drain until it drains at a slow trickle.
- Reinstall the overflow plug with a new o-ring lightly coated in fresh ATF and tighten.
- Shut the engine off
- Torque your Refill plug to 29 ft-lbs
- Torque your Overflow plug to 15 ft-lbs
- Torque your Drain plug to 15 ft-lbs
- Wipe down all surfaces
- Start your engine and move your shifter slowly from Park to Manual and back to Park.
- With a flashlight check all plugs and surfaces for leaks.
- Shut your engine off, reinstall the under trays, and safely bring your car off jack stands and back to the ground.
That’s it, you’re done.
The reason you must operate the shifter and do multiple drain/fill cycles is because most of the fluid in the transmission is not in the transmission pan but is actually held in the torque converter and the valve body. By shifting after each fill procedure you’re forcing the fluid to move around in the transmission and exchange.
Simplified Form
You do 3 drain/refill cycles, then do a fluid leveling procedure. The fluid leveling procedure involves jumping pin 4 and pin 13 on the ODB2 port and doing a shifter sequence to activate, which uses the shift indicators to show you when the transmission fluid temperature is correct to open the overflow plug. You must leave the engine running during the fluid leveling procedure. After you’ve finished, you check for leaks and reinstall the undertrays and you’re done.
I hope this post helps someone!